
The PyTorch cat() function in Python is a powerful tool for concatenating tensors along a specified dimension. This function allows you to combine multidimensional tensors along a particular dimension, resulting in a single tensor. In this article, we will explore the implementation and visualization of the PyTorch cat() function to provide a comprehensive understanding.
Syntax of the pytorch cat() Function
The PyTorch cat() function allows you to concatenate tensors along a specified dimension. Its syntax is as follows:
torch.cat(tensors, dim=0, out=None)tensors: Input tensors that you want to concatenate. These tensors should be provided as a tuple, list, or sequence.dim: Specifies the dimension along which the tensors should be concatenated. The default value is 0, indicating concatenation along the rows.out(optional): An optional output tensor to store the result of the concatenation operation.
using the cat() function in Python
Here’s an example of how to use the PyTorch cat() function:
import torch

# Define two tensors
tensor1 = torch.tensor([[1, 2, 3], [4, 5, 6]])
tensor2 = torch.tensor([[7, 8, 9], [10, 11, 12]])

# Concatenate the tensors along dimension 0 (rows)
concatenated_tensor = torch.cat((tensor1, tensor2), dim=0)

# Print the concatenated tensors
print(concatenated_tensor)
Output:
tensor([[ 1,  2,  3],
        [ 4,  5,  6],
        [ 7,  8,  9],
        [10, 11, 12]])
In the above example, two 2×3 tensors, tensor1 and tensor2, are defined using tensor() function of pytorch. Then, the torch.cat() function is used to concatenate these tensors along dimension 0 (rows), creating a new tensor with dimensions 4×3. Finally, the concatenated tensor is printed, resulting in a 4×3 matrix with the values from both input tensors combined along the rows.
Note: While using the PyTorch cat() function, it’s not necessary for the input tensors to have the exact same shape. What’s crucial is that they should have compatible shapes along the chosen concatenation dimension. This dimension, often referred to as the concatenation axis, determines how the tensors will be combined. For instance, selecting dimension 0 concatenates tensors along rows, while dimension 1 concatenates along columns.
exploring the ‘dim’ Parameter
The dim parameter in the cat() function specifies the dimension along which the tensors should be concatenated. By convention, 0 means concatenating along rows, while 1 means concatenating along columns. You can also use -1 to refer to the last dimension, allowing the function to determine the appropriate dimension dynamically.
If the dimension is set to -1 in the cat() function, it combine the tensors, even if they have different sizes, by automatically aligning them along their last dimension. This makes the code more flexible and adaptable, as you don’t need to know the specific dimension size in advance.
Here’s an example of using a PyTorch cat() function with dimension pre-set to -1:
import torch

tensor1 = torch.tensor([[1, 2, 3],
                        [4, 5, 6]])
tensor2 = torch.tensor([[7, 8, 9],
                        [10, 11, 12]])

concatenated_tensor = torch.cat((tensor1, tensor2), dim=-1)
print(concatenated_tensor)
Output:
tensor([[ 1,  2,  3,  7,  8,  9],
        [ 4,  5,  6, 10, 11, 12]])
And here’s an example of using a PyTorch cat() function with dimension set to 0:
import torch

tensor1 = torch.tensor([[1, 2, 3],
                        [4, 5, 6]])
tensor2 = torch.tensor([[7, 8, 9],
                        [10, 11, 12]])

concatenated_tensor = torch.cat((tensor1, tensor2), dim=0)
print(concatenated_tensor)
Output:
tensor([[ 1,  2,  3],
        [ 4,  5,  6],
        [ 7,  8,  9],
        [10, 11, 12]])
Using a dimension parameter of 0 means that you are concatenating the input tensors along the rows. This operation stacks the tensors vertically, increasing the number of rows in the resulting tensor.
Concatenating Tensors with Different Vector Sizes
torch.cat() can concatenate tensors of different shapes, as long as they have compatible dimensions along the chosen concatenation axis. However, attempting to concatenate tensors with completely different shapes will result in a ValueError, indicating a size mismatch.
Here’s an example of concatenating tensors with different sizes along the second-to-last dimension (-2):
import torch

# Create three tensors with different sizes along the second-to-last dimension
tensor_1 = torch.tensor([[22, 17], [3, 39]])  # Shape: (2, 2)
tensor_2 = torch.tensor([[12, 3], [29, 55], [9, 2]])  # Shape: (3, 2)
tensor_3 = torch.tensor([[12, 29], [29, 55]])  # Shape: (2, 2)

# Concatenate tensors along the second-to-last dimension using -2
cat_tensor = torch.cat((tensor_1, tensor_2, tensor_3), dim=-2)

print("Tensor 1:", tensor_1, type(tensor_1))
print("\nTensor 2:", tensor_2, type(tensor_2))
print("\nTensor 3:", tensor_3, type(tensor_3))

print("\nConcatenation along dimension set to the second-to-last dimension:", cat_tensor.size())
print(cat_tensor)
Output:
Tensor 1: tensor([[22, 17],
        [ 3, 39]]) <class 'torch.Tensor'>

Tensor 2: tensor([[12,  3],
        [29, 55],
        [ 9,  2]]) <class 'torch.Tensor'>

Tensor 3: tensor([[12, 29],
        [29, 55]]) <class 'torch.Tensor'>

Concatenation along dimension set to the second-to-last dimension: torch.Size([7, 2])
tensor([[22, 17],
        [ 3, 39],
        [12,  3],
        [29, 55],
        [ 9,  2],
        [12, 29],
        [29, 55]])
Concatenating 3D Tensors Along Different Dimensions
When working with 3D tensors, concatenation along different dimensions can be extremely useful for various tasks. Using the cat() function with the appropriate dimension parameter, you can effectively combine 3D tensors to expand the depth or change the width of the resulting tensor.
Here are examples of concatenating along dimensions 0 and -1:
Concatenating Along Dimension 0:
In the following example, the PyTorch cat() function concatenates tensors along dimension 0:
import torch

# Creating sample 3D tensors
tensor1 = torch.tensor([[[1, 2, 3],
                         [4, 5, 6]],
                        [[7, 8, 9],
                         [10, 11, 12]]])

tensor2 = torch.tensor([[[13, 14, 15],
                         [16, 17, 18]],
                        [[19, 20, 21],
                         [22, 23, 24]]])

concatenated_tensor_dim0 = torch.cat((tensor1, tensor2), dim=0)
print(concatenated_tensor_dim0, concatenated_tensor_dim0.size())
Output:
tensor([[[ 1,  2,  3],
         [ 4,  5,  6]],

        [[ 7,  8,  9],
         [10, 11, 12]],

        [[13, 14, 15],
         [16, 17, 18]],

        [[19, 20, 21],
         [22, 23, 24]]]) torch.Size([4, 2, 3])
In this example, the concatenated tensor now has a shape of (4, 2, 3) because you have concatenated both input tensors in the first dimension. This means the two input tensors have been stacked vertically to construct a new tensor with four 2×3 matrices.
Concatenating Along Dimension -1:
In the following example, the PyTorch cat() function concatenates tensors along dimension -1:
import torch

# Creating sample 3D tensors
tensor1 = torch.tensor([[[1, 2, 3],
                         [4, 5, 6]],
                        [[7, 8, 9],
                         [10, 11, 12]]])

tensor2 = torch.tensor([[[13, 14, 15],
                         [16, 17, 18]],
                        [[19, 20, 21],
                         [22, 23, 24]]])

concatenated_tensor_dim_minus1 = torch.cat((tensor1, tensor2), dim=-1)
print(concatenated_tensor_dim_minus1, concatenated_tensor_dim_minus1.size())
Output:
tensor([[[ 1,  2,  3, 13, 14, 15],
         [ 4,  5,  6, 16, 17, 18]],

        [[ 7,  8,  9, 19, 20, 21],
         [10, 11, 12, 22, 23, 24]]]) torch.Size([2, 2, 6])
In this example, the concatenated tensor has acquired a size of (2, 2, 6) because you have concatenated both input tensors in the last dimension. This means the two input tensors have been placed horizontally to construct a new tensor with two 2×6 matrices.
PyTorch Cat() vs Stack() function in Python
PyTorch provides two functions for combining tensors: cat() and stack(). While both functions perform similar tasks, they differ in their behavior.
The stack() function in PyTorch constructs a new dimension and stacks tensors along that dimension. It takes a sequence of tensors as input and stacks them along a newly created dimension. This operation effectively increases the rank or dimensionality of the resulting tensor.
For Example:
import torch

tensor1 = torch.tensor([1, 2, 3])
tensor2 = torch.tensor([4, 5, 6])

stacked_tensor = torch.stack((tensor1, tensor2), dim=0)
print(stacked_tensor)
Output:
tensor([[1, 2, 3],
        [4, 5, 6]])
However, the output will differ if we use the cat() function for the identical input tensors.
import torch

tensor1 = torch.tensor([1, 2, 3])
tensor2 = torch.tensor([4, 5, 6])

concatenated_tensor = torch.cat((tensor1, tensor2), dim=0)
print(concatenated_tensor)
Output:
tensor([1, 2, 3, 4, 5, 6])While using the cat() function concatenates tensors along an existing dimension, the stack() function introduces a new dimension by stacking tensors with identical shapes. Both functions have distinct use cases and can significantly enhance your tensor manipulation capabilities in PyTorch.
Using the PyTorch cat() Function and Matplotlib to Visualize Vectors in Tensors
PyTorch supports direct visualization of tensors without converting them to numpy arrays. The plt.show() function can display the matrices directly as images, allowing you to visualize the tensors directly.
To use the matplotlib library, you can install it using the following command:
pip install matplotlibNow, let’s incorporate the matplotlib library into your code to visualize the tensors.
The procedure is straightforward for visualizing vectors in Python. To visualize the values of cat_tensor after element-wise addition with broadcasting, you can use plt.scatter() and plt.show() to create scatter plots for each tensor. However, you need to extract the x and y coordinates into separate 1-dimensional tensors, x and y. In the first column, the syntax [:, 0] depicts index 0, and in the second column, the syntax [:, 1] depicts index 1.
import matplotlib.pyplot as plt
import torch as t

# Create a size 2x2 tensor
tensor_x_axis_1 = t.tensor([[22, 17], [29, 55]])
# Create a size 1x2 tensor (row vector)
tensor_y_axis_1 = t.tensor([[55, 29]])
# Concatenate tensors along the first dimension (vertical concatenation)
cat_tensor = t.cat((tensor_x_axis_1, tensor_y_axis_1))

# Extract X and Y coordinates for the scatter plot
x = cat_tensor[:, 0]
y = cat_tensor[:, 1]

# Create a scatter plot
plt.scatter(x, y)

# Add labels and title
plt.xlabel('X-axis')
plt.ylabel('Y-axis')
plt.title('Scatter Plot of Concatenated Tensors')

# Display the plot
plt.show()
Output:
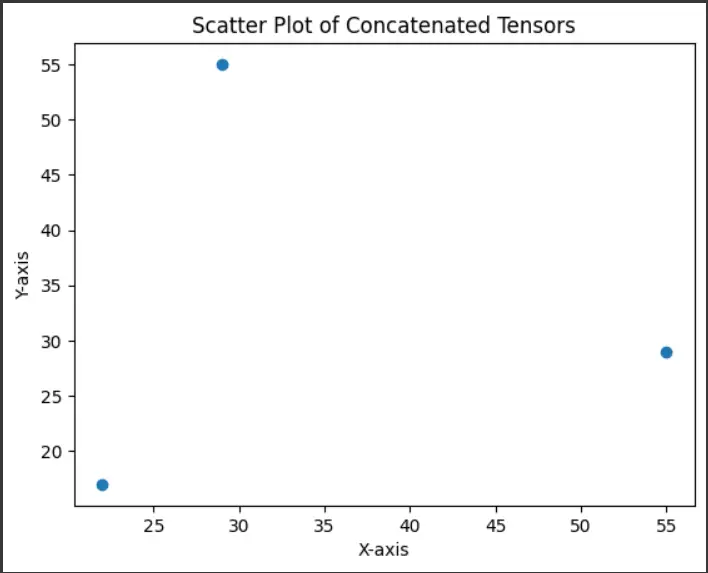
This code generates a scatter plot of the concatenated tensors. You first extract the x and y coordinates from the concatenated tensor using slicing. Then, you use matplotlib’s scatter() function to create a scatter plot, and finally, plt.show() displays the plot.
Conclusion
The PyTorch cat() function is a valuable tool for concatenating tensors along a specified dimension. It allows you to efficiently combine multidimensional tensors, whether you want to concatenate them along rows, columns, or other dimensions. Understanding how to use this function and its various parameters, including the dim parameter, is essential for working with tensors effectively in PyTorch. Additionally, knowing when to use cat() as opposed to stack() can help you manipulate tensors to meet your specific needs, whether you’re working with 1D, 2D, or 3D data.
By following the examples and guidelines provided in this article, you can leverage the power of the PyTorch cat() function to enhance your deep learning and data manipulation projects.
This comprehensive guide has covered the essential aspects of the PyTorch cat() function, from its syntax to practical examples in various contexts. With this knowledge, you can confidently use the cat() function to manipulate tensors in your PyTorch projects.
For any queries, contact us.